Atomic Markets for Both Non-Fungible and Fungible Tokens
October 10, 2018
A generalized tool-set for building your very own atomic price-based spot market
For over a year now I have been hard at work designing a number of market smart contracts, infrastructure, and UI for Nori’s carbon marketplace. From time to time I try to publicly record some of that progress. In previous posts, I introduced the idea of an atomic market for non-fungible tokens (NFTs) and fungible tokens. And whilst in those previous posts I have taken a lighter and more humorous approach to otherwise dense topics, this post is going to feel quite different, as the content is best delivered in a tutorial-like format.
Since my previous post I have released a truffle box which easily allows anyone to experiment and build their own marketplace. Now, over a series of posts, I’m going to dive more into that code and investigate different market types and how you can use them. The outline for the next few posts in this series will be the following:
- Part 1: What’s in the box: “price-based spot markets”
- Part 2: What’s in the box: “FIFO single-price markets”
- Part 3: What’s in the box: “forward markets”
- Part 4: How Nori is using FIFO and forward markets to ultimately disrupt the way traditional carbon markets work today
Now, as might be obvious my looking at the outline, this version of the truffle box is intended to be BYOUI (bring your own UI). Although this box contains the meat to create simple atomic markets it is perhaps non-obvious that building a UX compatible with such is the real hook. And what kind of writer would I be to not save the best for last?
So as to keep this post simple and straightforward (and focused solely on the functionality for the first three parts), we will forget that user interfaces exist and focus purely on the functionality. Now, if you are eager to build a UI, this box was designed with the idea that you can use it in your very own way, agnostic to pre-existing user interfaces or frameworks. That said, if you want a simple way to interact with this, I’d suggest running the all-to-magical create-react-app command from within the location that you un-box this code and you can get a jump-start writing a UI as a branch off of any part of this series. For those a little less trigger-happy, wait until the latter part of the series, and we will show you exactly what Nori is doing to hook a scalable UI into these of market contracts.
Only interested in the code and not the walk-through? Click here
Getting started with the atomic-markets box
Getting started is easy, simple, just run the following commands (make sure you’ve already installed truffle):
Now that you have the code locally, you can run the test command:
truffle testAfter running this you’ll see the tests output their run and be assured that everything is working as intended:
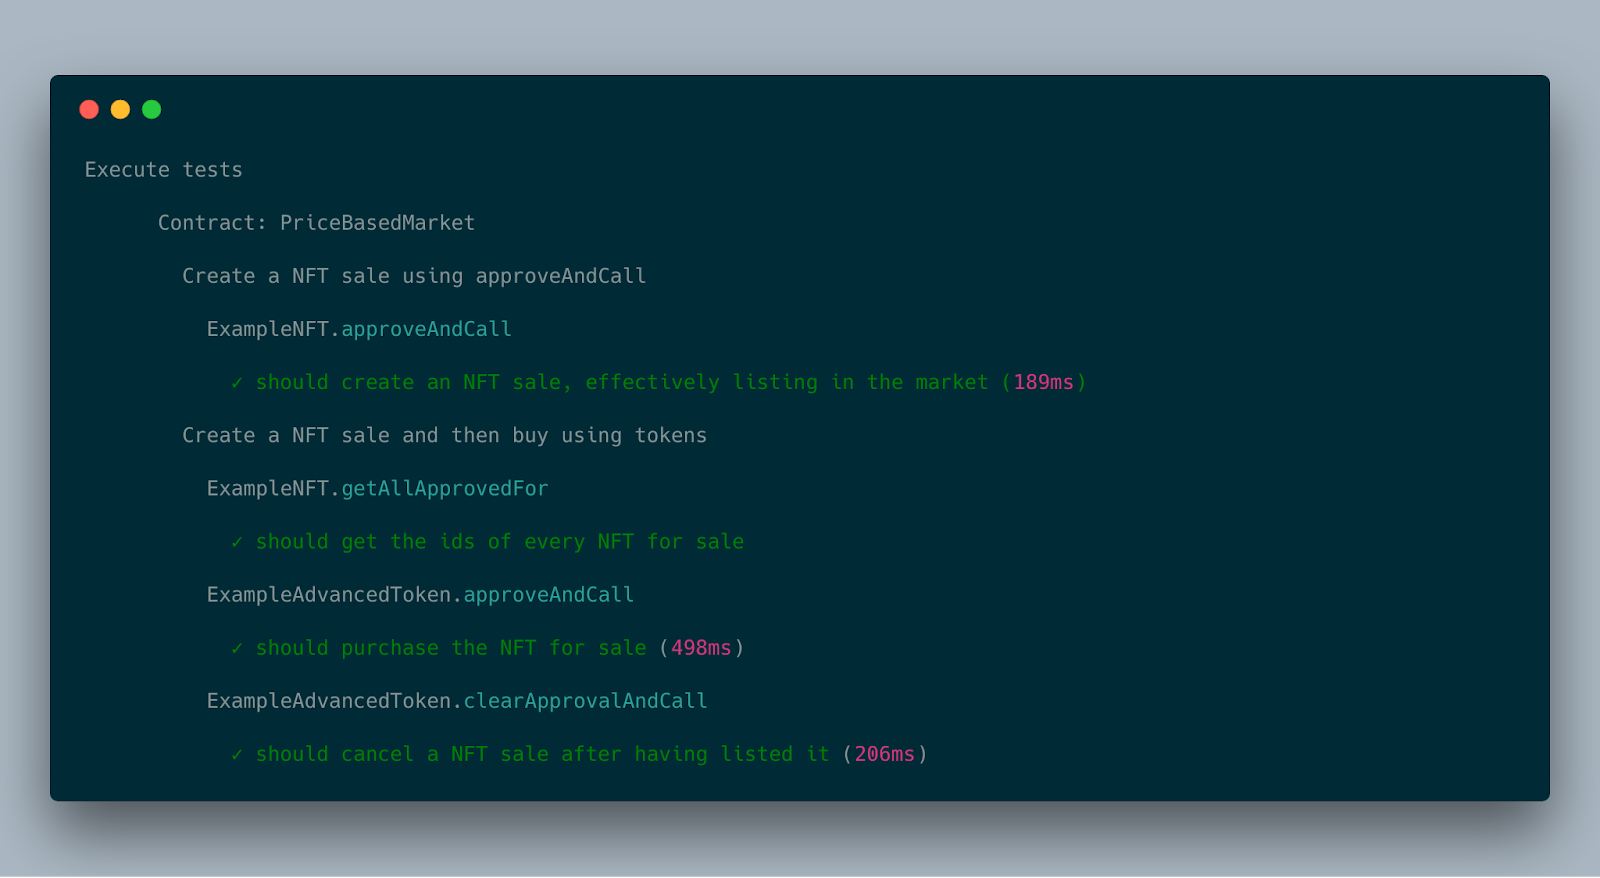
Each step above can be broken down into a description of the code’s supported functionality:
- The first tests shows that you can create a sale in the market
- Then it shows that you can get the IDs of all of the NFTs currently for sale
- Then it shows that you can purchase the NFT previously listed for sale
- And finally, it executes a test showing that you can cancel an existing NFT sale
Now, let’s back up just a bit and talk about exactly what is inside of this black-box you just unpacked that allowed for these passing test-cases.
- Market contracts: These base contracts allow for the creation of various types of marketplaces. For the purpose of this post we are only going to be inspecting the price-based spot market contract.
- Fungible ERC-777 token contracts: These contracts give you all the base contracts needed to create an advanced fungible token.
- Non-fungible ERC-721 contracts: The non-fungible token contracts allow you to get a quick start creating your very own non-fungible asset or commodity.
- The ERC-820 registry contract: This registry contract is an integral part to the advanced fungible token type and an alternative to the de facto ERC-165 registry used by the non-fungible tokens. How this contract works deserves a post of its own, and since I previously introduced it in this post, I’m not going to go into too much detail about how it works here.
With just these four components, you have everything you need to build a fully-functional atomic market.
The way each of these contracts talks to each other is best described in the atomic market post[link here]. But to summarize, at your fingertips you’ve got a fungible buyer’s instrument (fungible tokens), a non-fungible seller’s instrument (NFTs) a market contract (the medium of which those tokens and NFTs get exchanged), and a registry (the mechanism necessary to allow for truly atomic exchanges).
What are spot markets?
The spot market is where financial instruments, such as commodities and securities, are traded for immediate delivery. — Investopedia
If you have ever used a centralized exchange, then chances are, the default is something akin to a spot market. Now, the only big difference between what you might see there, versus what you will see here, is that in these contracts the asset exchange is happening between a fungible and non-fungible asset. Additionally, these contracts can be seen as a permission-less alternative to such centralized exchanges.
Dissecting the price-based market contracts contracts
The spot market contract logic an be best broken down by inspecting the logic of the code therein. The first thing a market needs is a way to create a sale. Now, unlike a traditional smart contract, atomic markets can leverage token contract’s themselves to interact with a market. In that, today when most people interact with an exchange contract, what they are doing is depositing a token into the exchange contract, and then sending a second successive transaction to the same contract telling it to create a sale with the deposited token.
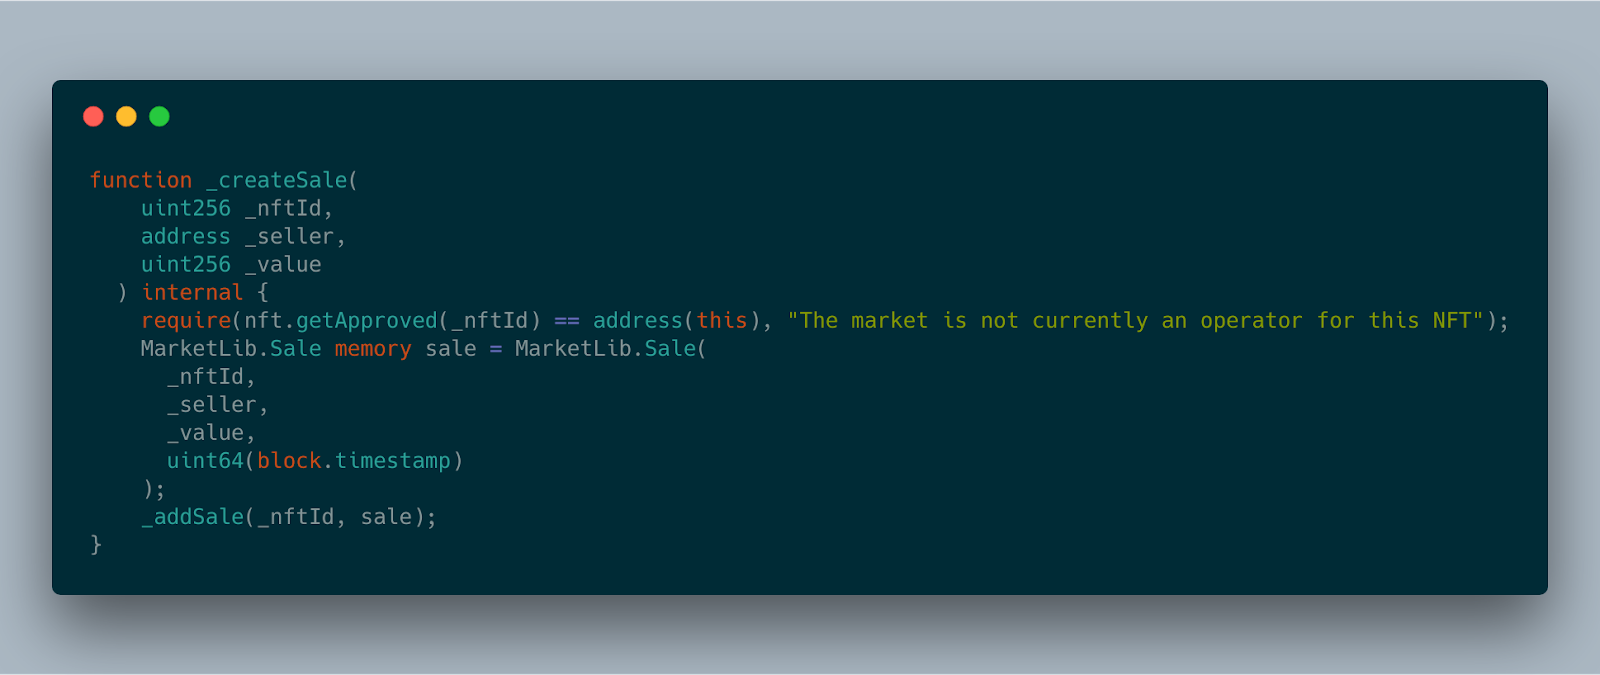
But that’s annoying! It means more transactions for one, and for two it means handing over custody of the asset to this contract until you withdraw it. Instead, using an extension to the NFT contract, we define a function which instead grants a contract address the ability to swap the specified NFT for the seller’s desired price:
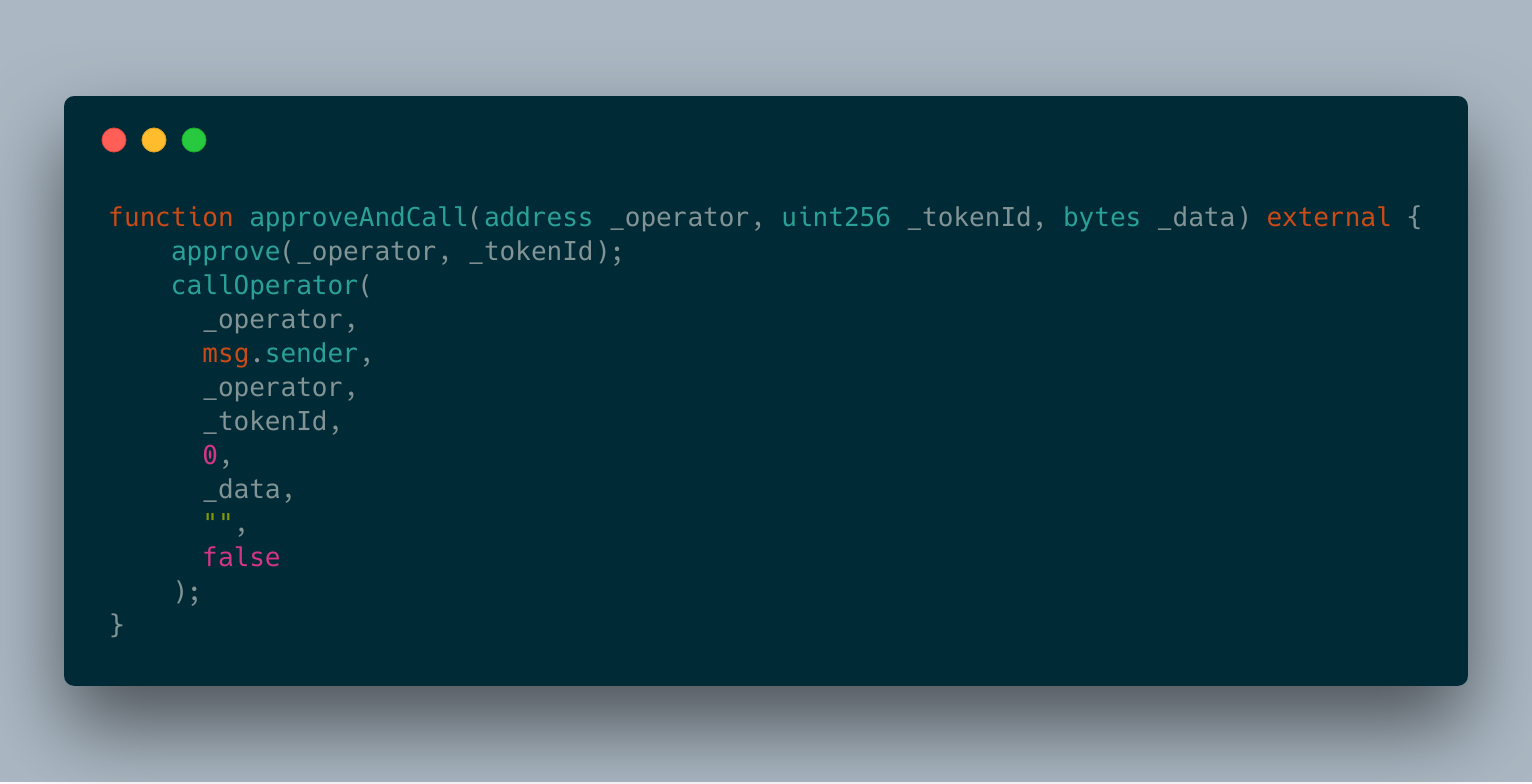
The above function is what we use to create sale listings for NFTs. Now, this may be non-obvious as to exactly how it does that. Where do you define the price for the asset, and furthermore, how does the NFT contract know how to tell the market that this is intended to create a market sale listing versus just approving some random third-party an allowance (which is the traditional use-case for allowance functions like this)? That’s best broken into two parts.
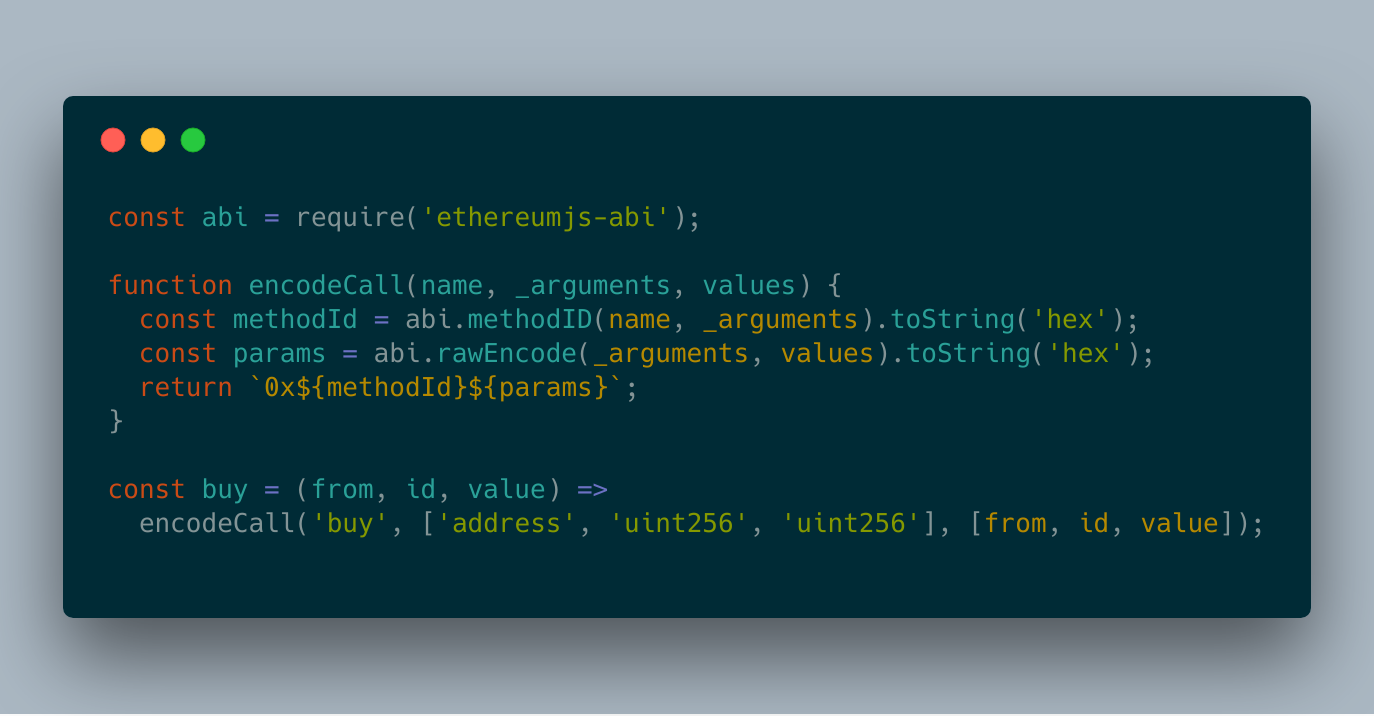
First, the price is specified in the _data parameter of the function. We do so by encoding the function call data for the market’s createSale function (which is defined later). To encode it we can make use of the following snippet:
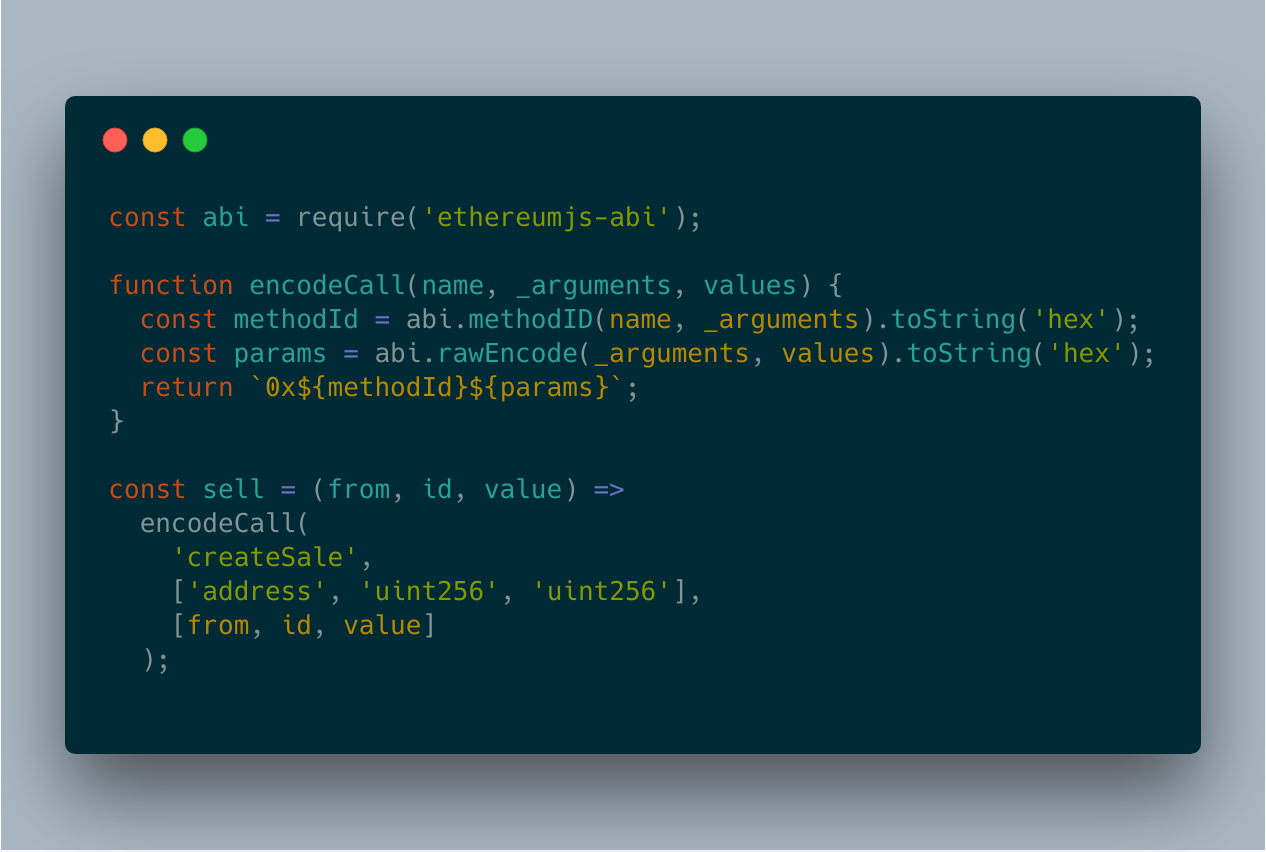
As you might see in the above, we set a price for the NFT by passing in the NFT to sell, the address of the seller, and the value that the seller is asking for (in fungible-token terms). Finally we pass in this data directly into the “approveAndCall” function by using something like the following:
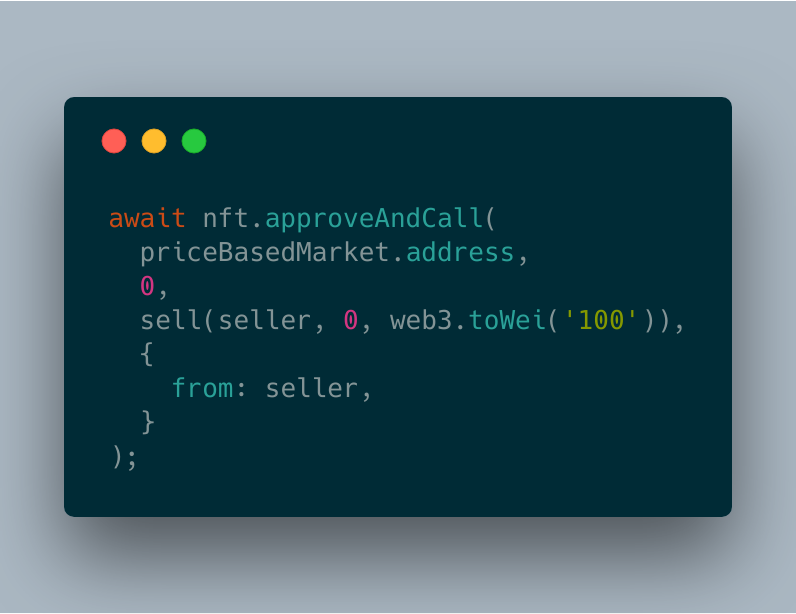
The above effectively authorizes the market contract to swap the asset if a matching buy order is met (and it does so without releasing custody of the asset itself)!
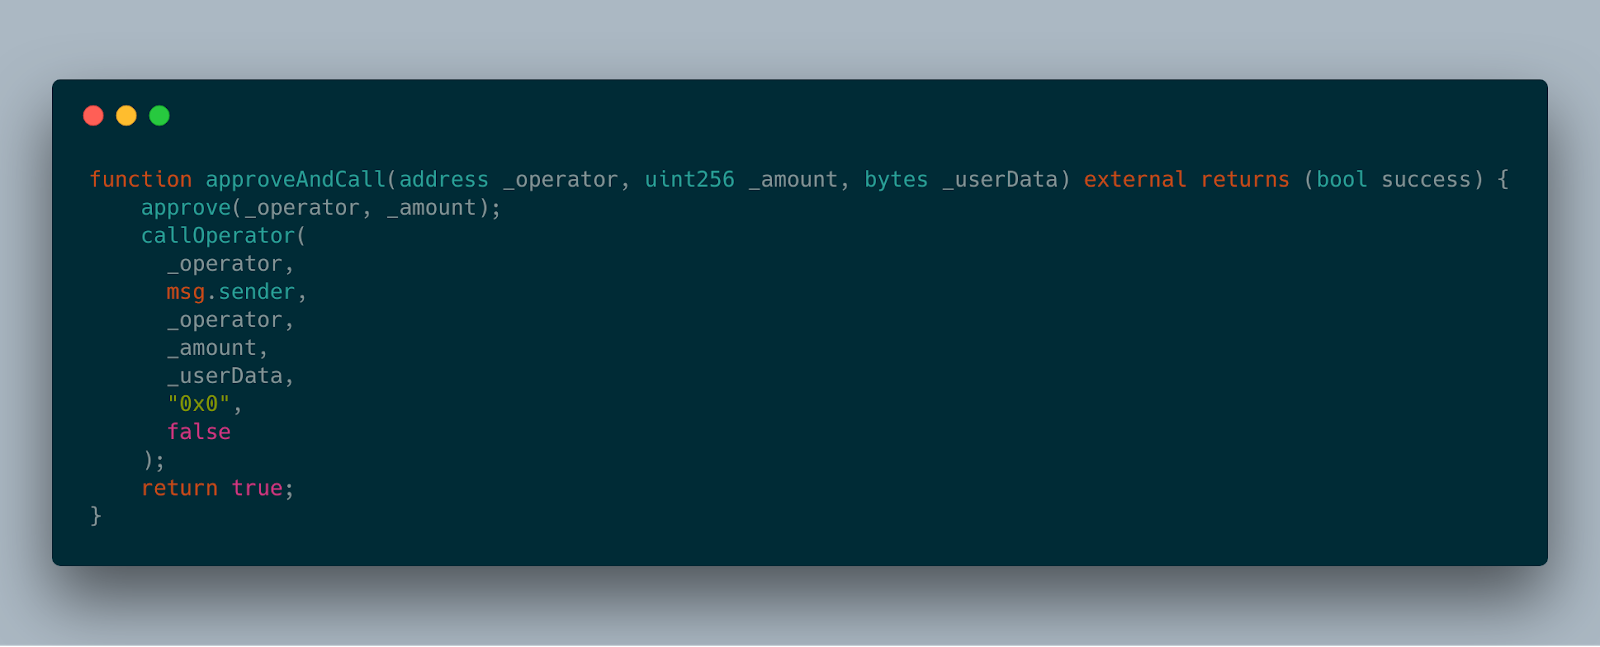
Now, the second part of the “approveAndCall” function necessary to satisfy this form of sale creation is a function called “callOperator”. Since what happens inside of that function is best explained in detail in another post, the simple summary is that it is used to look up whether the address being granted this approval defines a successive function that the NFT should invoke after having granted it approval. In this case, the recipient address indeed defines such a function.
When we approved the market contract address, it was able to look up from a registry using the address parameter specified and in return the registry was able to effectively tell the NFT contract what it needs to do next. In this case, in addition to granting approval to the market, the NFT needs to invoke a create sale function in that same recipient address. Voila! This seemingly complex logic flow is what allows the creation of a sale in the spot-market’s order book.
Next, we define an additional function so that we can retrieve all NFTs currently listed for sale in the spot-market:
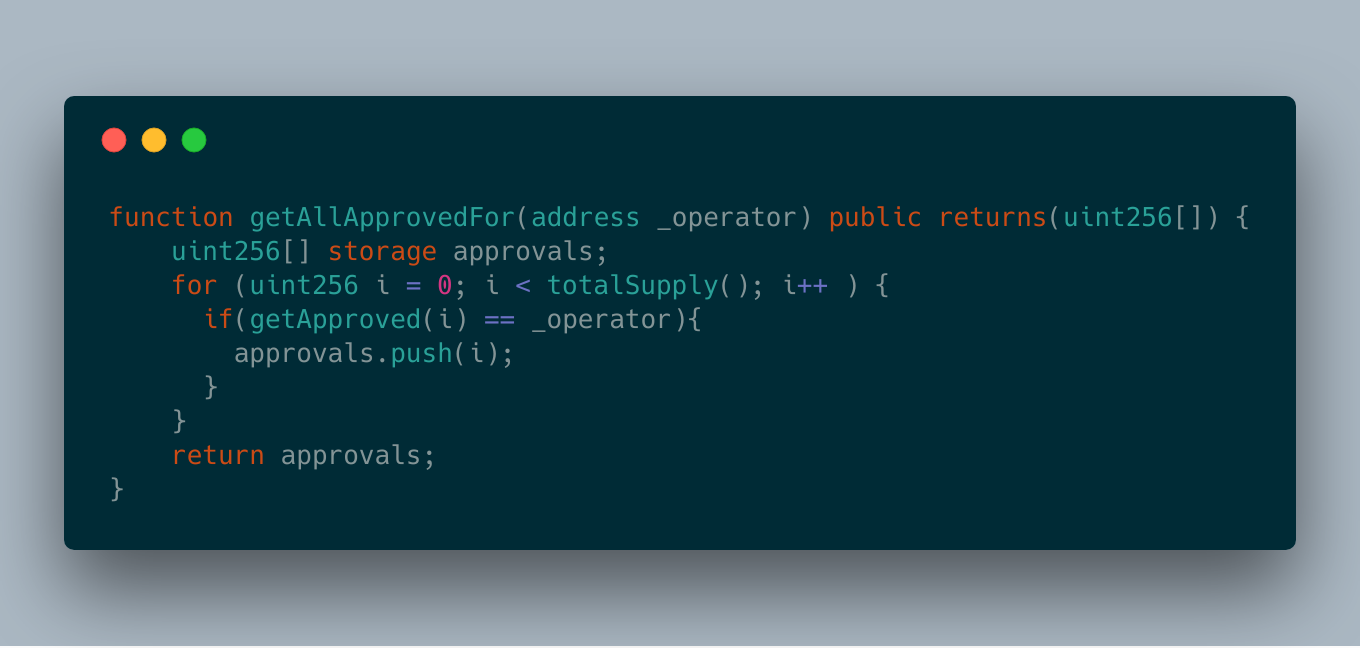
Summarizing the above, this function returns all of the IDs currently approved for atomic swaps in the market.
No market is complete if all you can do is list a sale! We also need a way to purchase the NFTs listed for sale. To do this, we define a very similar function to the one we defined to create a sale, but this time we do so in our fungible token contract:
This function is what allows the market to satisfy an existing sale listing. Since this function is fundamentally similar to the NFT’s sale creation function, we don’t need to break down how the contained logic works. What is different, however, is the logic found when the registry contract responds to the fungible token contract, and the “_userData” parameter requirement. For this parameter we need to pass it the purchasing data as an encoded parameter. We can do so with the following (and then pass that data into this function in the same way we did so with the NFT approve function):
Also, since we aren’t creating a sale with our fungible tokens, and have instead purposed them as a buying instrument, the registry contract will respond to the “callOperator” invocation with the logic used to buy the specified NFT (which the token contract will successively use):
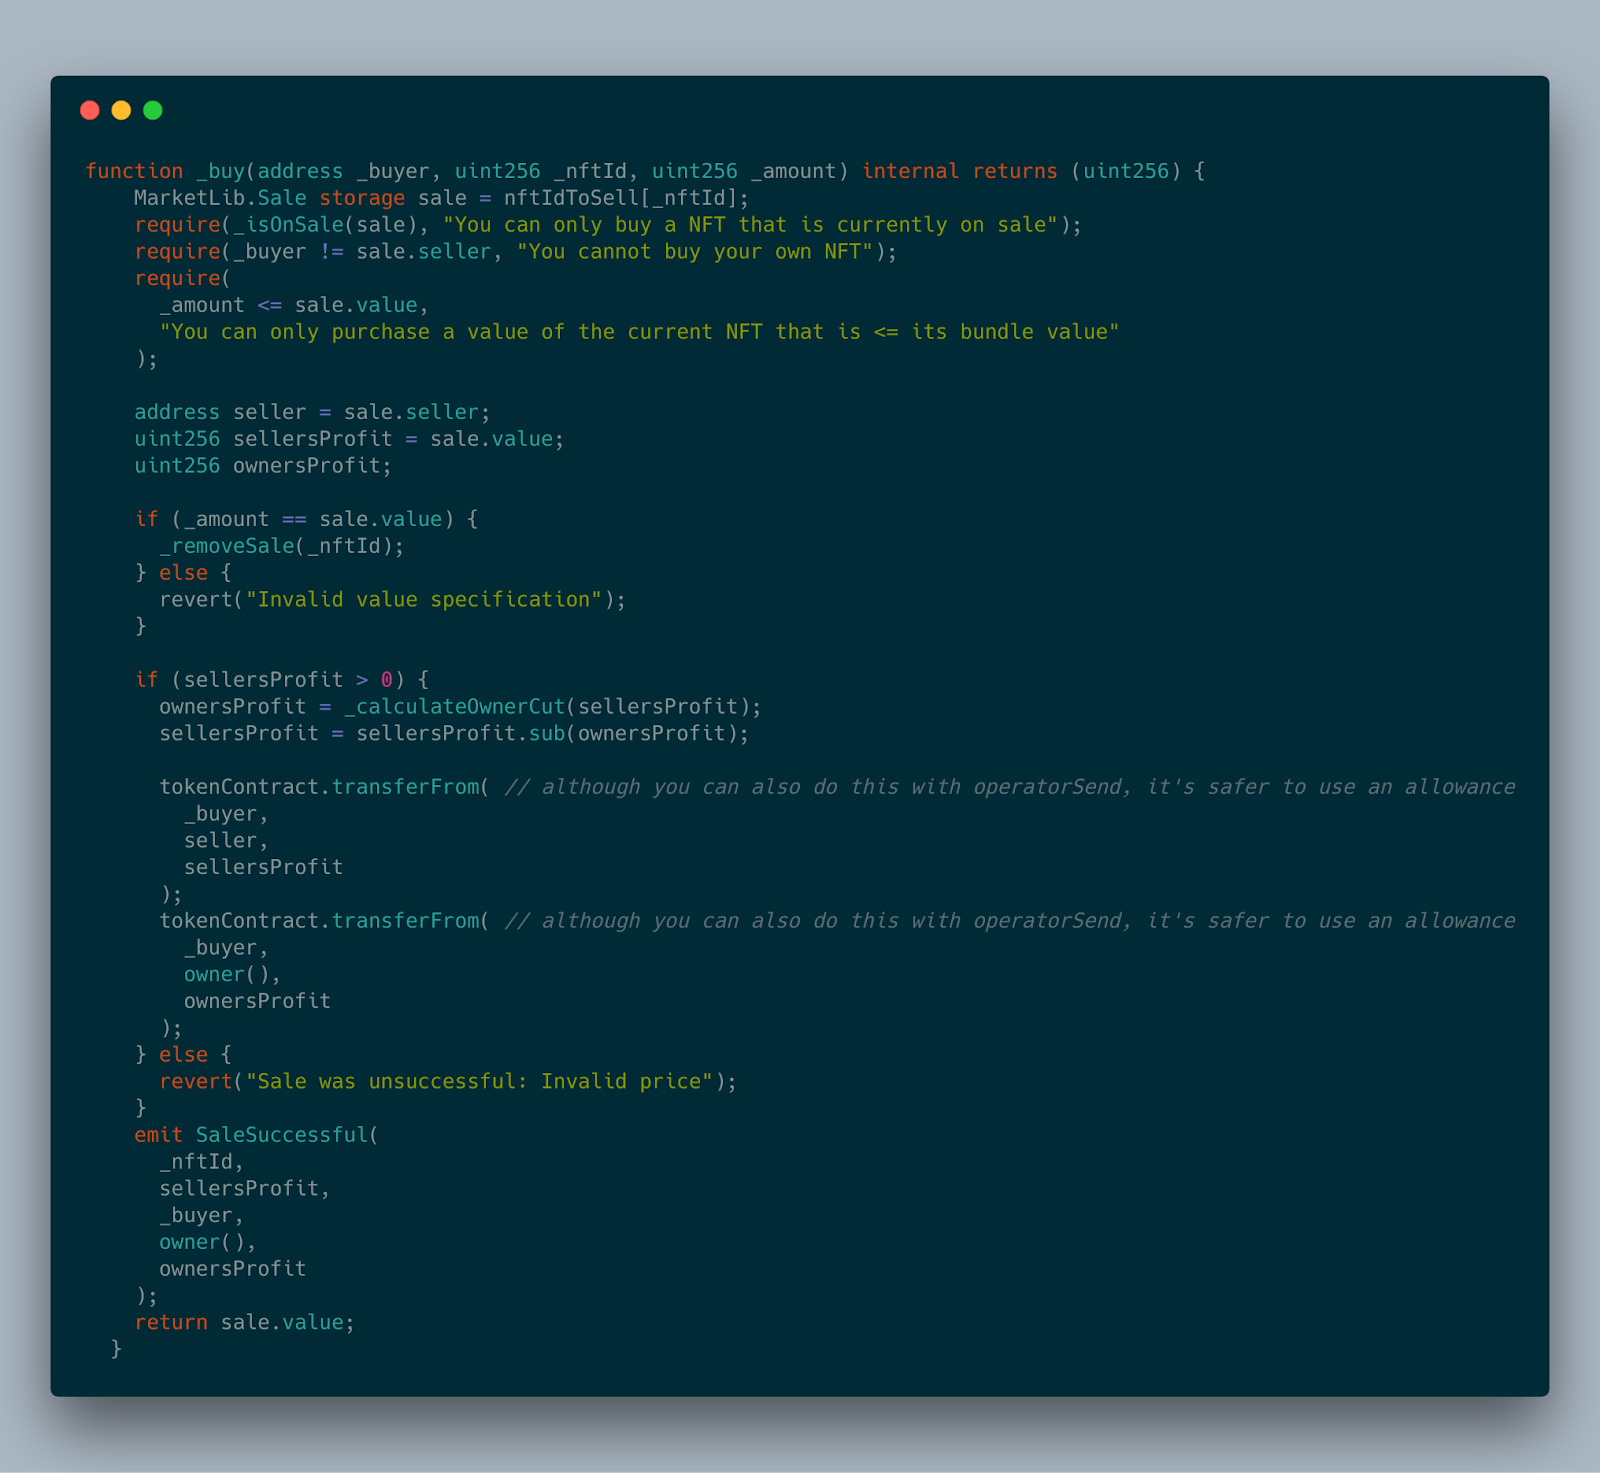
To summarize this comparatively monster-looking logic, when the market is given approval for an amount of tokens, along with encoded data which can be decoded to find the prescribed sale the buyer is wanting to buy, then the fungible token is will initiate the swap for the seller’s NFT.
Now, while that sums up the majority of how these contracts work, there is one additional functionality contained in this box that serves as an extra bit of icing on the cake:
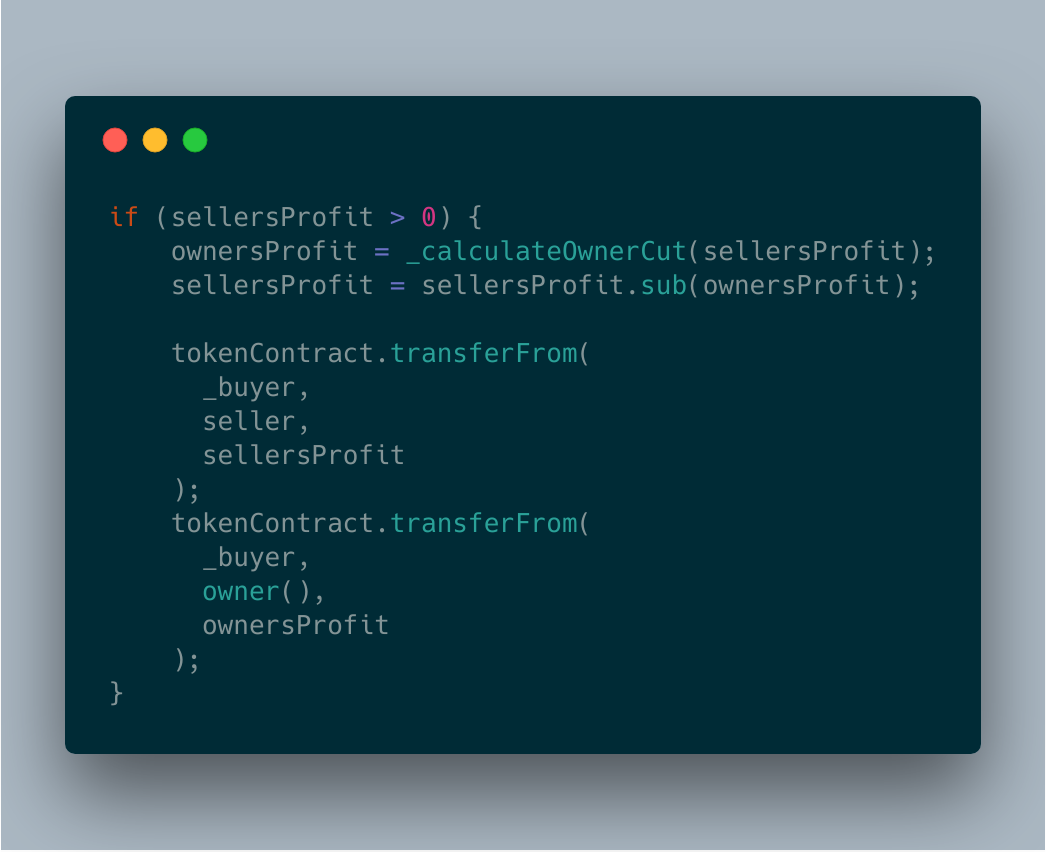
What market is complete without giving the operator of the market the ability to take a little bit of the profit?! What is described above is the logic that when the buy function is called, part of the profit from the sale is distributed to the owner of the market. This particular cut can be customized and changed to your own heart’s content.
That’s it! However, what might not be obvious yet, is why this is not where the series ends. Without jumping too far ahead, spot markets are not perfect solutions. Many cases require ultimately changing exchange behavior to satisfy the constraints of the complexity of the market, or to disrupt types of behaviors frequently exploited by users of said markets. But that will be the topic of the next post.
Hungry for More Nori?
- Listen to our podcast.
- Review our webinars on different elements of the market design.
- Read our white paper for technical details.
- Follow me on Twitter
- Not an accredited investor, but still want to support? Invest in the public campaign on Republic.